Salt Dough – easy activity for kids
Easy salt dough recipe
DIY Salt dough is an amazing thing. You can literally create anything you can imagine. It is a great way to entertain your kid and actively let them participate. Easy to make and with ingredients you probably always have in your kitchen anyway. I made some with my toddler today and we created “fake food” for her play kitchen amongst other things.
Warning: salt dough is NOT edible. Eating it can cause stomach pain.
Pin it for later:

What you need
1 part salt
2 parts Flour
1 part water
Some oil
Parchment paper
Bowl
Kitchen utensils, cookie cutter
Straw (to make holes if you want to hang anything up)
Switch out the part for any measurement depending on how much you want. We used a cup as our measurement and it was plenty for a whole baking sheet. As long as you keep the 1:2:1 ratio it’s fine. Adding just a little oil to it makes the dough more durable and easier to work with but it is not a must.
Do you need more ways to keep your kid busy? This might be interesting for you:
– Fun kids activities for indoor and outdoor
– DIY Busy Book for toddler and preschoolers
– Sensory Bin
– Moon Sand DIY
– Edible Bathtub paint
– Taste safe play dough recipe
How to make it
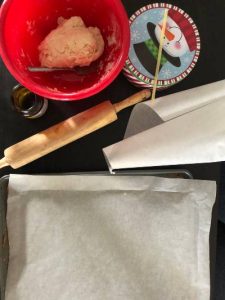
- Put a baking sheet with parchment paper aside and mix all the ingredients. Knead the dough really good until it is smooth and roll it out on a separate parchment paper or right on your countertop/table. You do not want to make the dough too thin or it will break later.

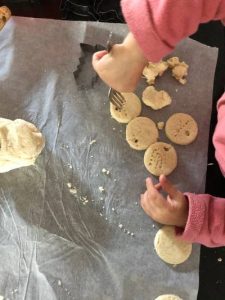
- Now you can get creative – you can use whatever you have in your kitchen to create. We used an empty bottle to make round ornaments, a fork for a unique pattern and a straw to make holes so we can use the round ones as tags later.
We also used our hello kitty cookie cutters and made our own bread, banana, and even a macaroon. A toothpick is great to make the pattern on top of the bread.
- Once you’re done creating, set your oven to the lowest temperature possible. (Mine wouldn’t let me go below 170F) and bake your goods for about 60 minutes. Open the oven once in a while to let the moisture escape. This is only to dry everything and get all the moisture out. You can let it air dry too but that may take up to 3 days.
- After about 30 minutes or halfway through, turn all your creations around. Since the temperature is so low I was able to do it with my hand but a spatula is a great tool for that too.
- After that crank up the heat to about 300F for another 50-60 minutes and again flip your creations about half way trough. Let everything cool down completely before you keep going.
- Once everything is cool you can use acrylic paint to decorate your creations as you wish. I suggest starting your salt dough project in the morning so everything is ready to be painted by the afternoon.

My toddler had a great time during the whole process and loved rolling out the dough and kneading it. She was also very interested in the fork to make a pattern in our round ornaments.
I love using salt dough for numerous occasions.
For my baby’s first Christmas we made ornaments with hand and footprints for all the grandparents.
Salt dough makes the perfect play food for the play kitchen.
When you’re ready to paint the salt dough I can only recommend doing the following:
- put the salt dough in a box
- Undress your toddler or use very old clothes (we ended up with more paint all over the kid than the salt dough)
- Dress yourself in very old clothes too if you use acrylic paint since the paint does not come out
- Lay newspaper on the floor
- Don’t put too much paint at once on your kid’s brush

Have fun!
Do you need more ideas on how to keep your kid busy?
Subscribe to our email list and get free printable worksheets.